Of the Sega Saturn's many charms, perhaps the most appealing is the design of its controller. Nearly fifteen years after its Japanese introduction, the Sega Saturn joypad remains the most responsive controller available for any console, past, present, or future. It's become slightly antiquated in the 21st century due to its lack of analog thumbsticks, but there is no better way to play classic collections and the rare modern release presented in 2D than with the Saturn's sublime controller.
Knowing this, game companies have manufactured adapters for a variety of systems, ranging from Sega's Dreamcast to plain vanilla home computers. There was even a replica of the flawless Saturn controller released for the Playstation 2 in 2005. However, neither of these solutions are completely reliable. The adapters are limited to a handful of formats, and the replica controller has become obscenely expensive in the three years since it was available in import stores. Even if you're willing to shell out a hundred dollars or more for the joypad, there's no guarantee it will work with your favorite 2D games. Odin Sphere, the spiritual sequel to Princess Crown, refuses to recognize it, and it's just as useless with collections like Namco Museum 50th Anniversary and Mega Man Collection.
Perhaps the greatest frustration of all is that the razor-sharp precision of the Sega Saturn controller has been completely unattainable on Nintendo consoles, particularly the GameCube and its more popular successor the Wii. It's possible to get the replica controller working with the original Xbox if you daisychain it to an adapter, but if you're a GameCube or Wii fan, you're out of luck. Your only option would be to somehow build your own controller... which is exactly what I set out to do last night.

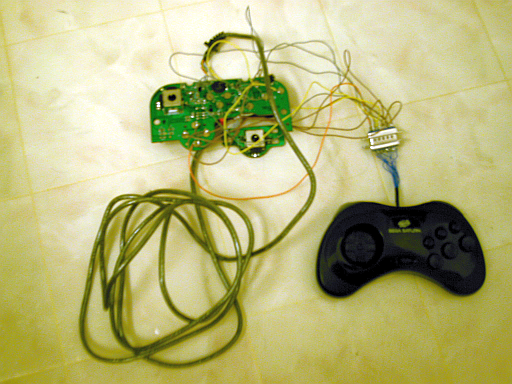
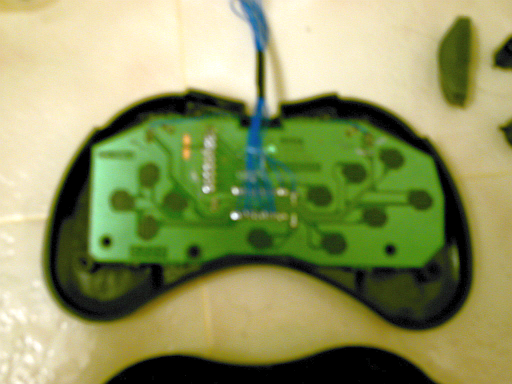
Inspired by similar projects on the Internet, I decided to make one of my spare Saturn controllers compatible with the GameCube and its close cousin. I first opened the Saturn controller, removed the original cable, popped off the logic chip in the center of the printed circuit board, then connected a series of very thin wires to the traces left in the chip's wake. These wires were then soldered to a male 15-pin D-shell connector.
(This connector is as old-school as it gets... it's used as the gameport in older personal computers as well as the controller port in the ancient Atari 5200 game system. It's not as elegant as the Saturn's flat connector, but it's extremely handy in a project like this, where you're making simple wire-to-wire connections rather than routing buttons through a logic chip.)

After I was finished with the Saturn controller, I then took a cheap third party GameCube joypad, opened the case, then soldered wires to the metal pads on its own printed circuit board. Some of these pads were split in half with an Xacto knife before making the connections to keep the signal and ground separate. The other ends of the wires were then soldered into another 15-pin D-shell connector; this time female.
There was a lot of setup involved, but all that effort was ultimately worthwhile. I'm a legendary klutz when it comes to electronics, and my projects rarely work the first time around. Luckily for me, this was one of those rare exceptions. I pulled my old GameCube out of the closet (no sense in taking any unnecessary risks with the Wii!), then plugged the finished project into it and popped in a copy of Alien Hominid. Every button I had wired up on both ends as well as the D-pad worked as planned. There were some slight issues with the A button sticking, but that was a mechanical error; something I fixed by cleaning the joypad housing with a toothbrush and a dab of dishwashing liquid.
Right now the joypad is working at 90% efficiency. I don't have the L and R buttons wired up on the GameCube controller, although those connections
have been made on the Saturn joypad. Also, you can't use the C button for GameCube games, since the system doesn't really have one. The good news is that this design doesn't limit me to just the GameCube or Wii... it's modular, so I can apply it to all
kinds of systems by tearing up their respective controllers. Holy crap, I just realized that I could make 3DO games playable with this hack! Way of the Warrior, here I come! Okay, maybe just Super Street Fighter II Turbo.
If you're handy with a soldering iron, I would definitely recommend giving this project a shot. All you need is a spare Saturn controller, a joypad from the game system you'd like to adapt, some very thin gauge wire (for the Saturn controller's PCB, it doesn't really matter what kind of wire you use for the other controller), and two 15-pin D-shell connectors; one male and one female. If you're feeling lost, this web site will give you some idea of what you'll need to do to get your Saturn controller working on other systems.
http://www.gamesx.com/controldata/usbsatpad/index.shtmlHowever, if you've ever worked with electronics, you won't have much trouble with this hack. There are no resistors, no capacitors, and none of that migraine-inducing electronics math... you just follow the traces from the pads on the Saturn controller's PCB to the buttons, and wire them up accordingly. Just make sure you're using a really thin tip on your soldering iron, and keep the wires separated so you won't get mixed signals while you're playing games.
I'll keep you guys informed on the progress of this mod, as well as its functionality with the Wii and any other modules I create in the future. I've already got my eyes set on that Super NES controller I've got buried in the closet...